9.0 Reports

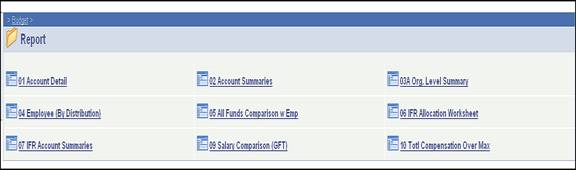
Click on a report in the list. The Run Control Search page will be displayed.
Run Control ID
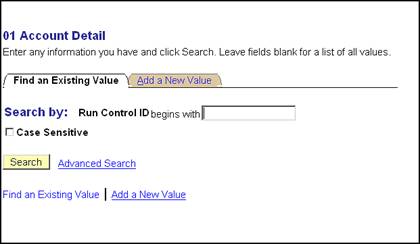
If you are new to CBM, click on Add a New Value. Enter a name for your Run Control ID that is no longer than 13 characters with no spaces. Click the Add button and the Report page will be displayed.
If you already have a Run Control ID, click the Search button.
If you have multiple Run Control IDs, a list of your Run Control IDs will be displayed.
Note that if you only have one Run Control ID, the Report page will be displayed next.
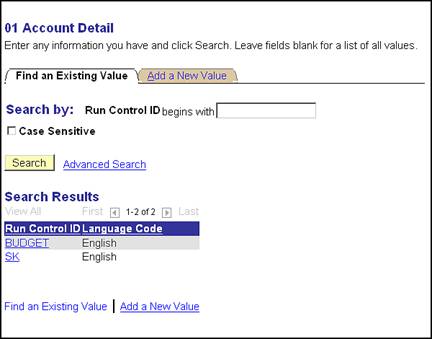
Click a Run Control ID from the list. The Report page will be displayed.
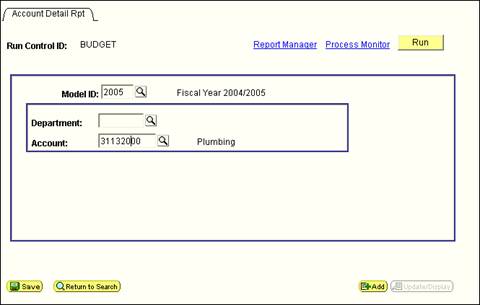
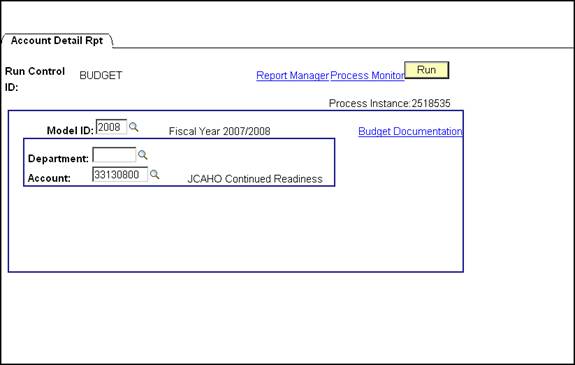
Input the Model and other Parameters for the selected report.
Click the Run button.
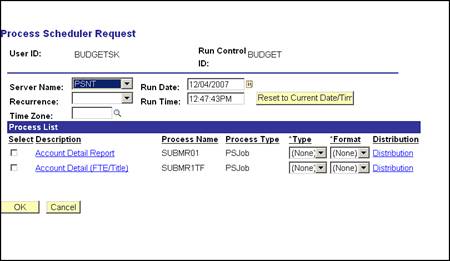
The Process Scheduler Request page will be displayed. This is where you will choose the specific report you want to run and set up the output parameters.
Click the link to the report version you wish to run; i.e. Account/Detail (FTE/Title)
Note that from this point forward, setting up to print in PeopleSoft 8.9 is different than in previous versions.
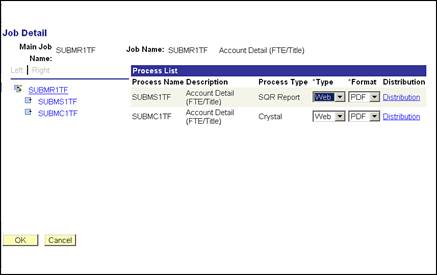
The Job Detail page will be displayed. For Process Type SQR Report and Crystal, make sure that Web is selected for Type and PDF is selected for Format.
Note: If you plan to Export the report to Excel, change the Crystal Format to RPT.
Click the OK button.
The Process Scheduler Request page will again be displayed.
From the Process List, check off the report you want to print. Click the OK button.

The Report page will again be displayed. Note that it now shows the Process Instance number for your print job under the Run button.
Click on Process Monitor.
Using Process Monitor to Check Report Status
The Process List page will be displayed. It shows the reports you have processed with the most recent report listed at the top.
Click the dropdown box to the left of the Refresh button and choose Days.
Make sure that the Type dropdown is blank.
Click the Refresh button to update the Run Status column in the grid.
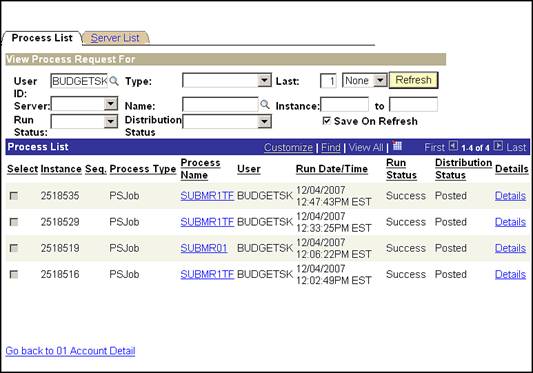
Each print job that you have submitted will show on an individual line that begins with its Process Instance number.
Click the Refresh button until the print job in the grid shows Run Status of Success; this means that your print job has completed processing.
When your report shows Run Status of Success, click the link under the report’s Process Name; i.e. SUBMR1TF.
The Process Detail page will be displayed.
For all reports except Report 05, click the third link that is displayed; i.e. SUBMC1TF.
(Since Report 05 is the only CBM report that does not produce a Crystal report, it will only show two links. Click the second link that is displayed to access this report.)
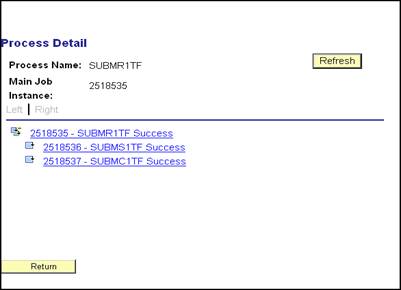
Clicking on the link will open up the next Process Detail page. To view and print your report, click View Log/Trace.

The View Log/Trace page will be displayed. In the Name column in the File List, click on the Report Name which starts with SUBM.
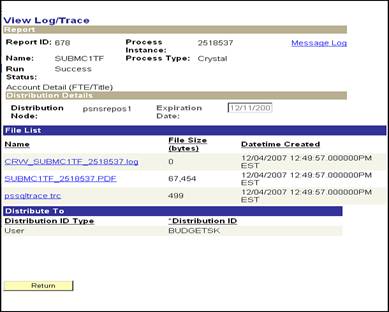
Finally!!! Your report will open in a separate window as an Adobe Acrobat Reader file or a Crystal report, depending on which Format you selected on the Job Detail page.
Click on File – Print to print the report.
Printing & Exporting From Report Files
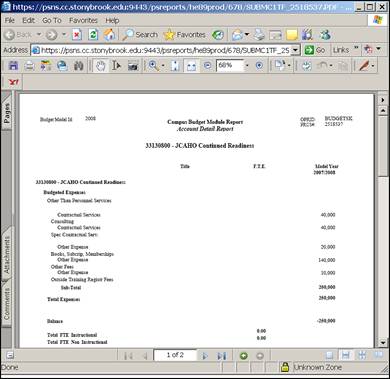
Your report will open in Adobe
Acrobat Reader in a new window.
To the left is a report sample.
You may click on File – Print to print the report from Acrobat Reader.
See below for instructions on printing the report from Crystal Reports.
Close the report window to get back to CBM.
Click Return, then Cancel, then Return buttons to return to Process Monitor.
Printing from Crystal Reports:
If you selected RPT as the format for your report, it will be generated in Crystal Reports format.
To print the report file:
- You can print the file from the File menu by selecting Print, then Printer, then clicking Okay.
- You can change the destination printer from the File menu by selecting Printer Setup.
To export the file to Excel:
- You can export the file into Excel from the File menu by selecting Print, then Export.
- From the Export box, select the following then click Ok.
Format: Excel
Destination: Disk File
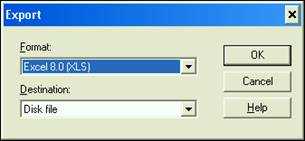
- Type the name that you would like to assign to your file, select the desired directory and click Save.
- You can now open your export file through the Excel application.
Report Types
There are currently fourteen reports in production:
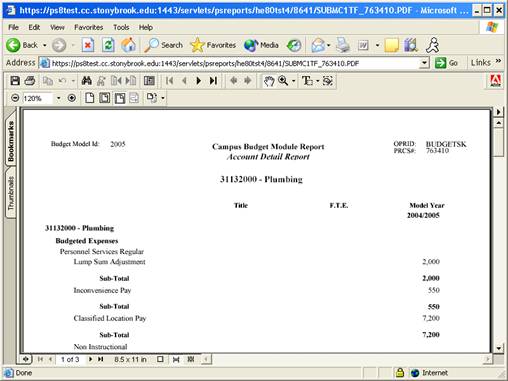
- Account Detail (#01)–
This report details the revenue, allocation, and expenditures budgeted within
an account by GL class. The base salary GL classes include employee names
and amounts. Also, the Notes fields are appended at the end of the report.
This report can be printed for individual accounts or departments. When you
run the report from the report panel, you will now see three choices at the
bottom of the Process Scheduler Request box: "Account Detail Report", "Hospital Account Detail", and "Account Detail (FTE/Title)". If you select "Account Detail Report",
data for the model year selected and the three related model years will be
displayed. If you select "Account Detail
(FTE/Title)" you will see data for the selected model year only with
the employee's FTE and Title listed. If you select "Hospital Account Detail" you will see the data in "FTE/Title" report plus the Hospital Overtime/Contract Labor FTE amounts and totals.
- Account Summaries (#02)
– This report displays the budgeted targets, revenue, allocation, and
expenditures by major categories for each account within an organizational
area. The accounts are grouped by organizational level. Since account balances
are included on this report, the targeted allocation was included (for appropriated
funds and IDC) in order to generate an accurate representation of an area’s
resources. This report can be printed for specific funds within a department
or for combinations of funds (i.e., State & IDC). When you run the report
from the report panel, you will now see two choices at the bottom of the Process
Scheduler Request box: "Account Summaries MF by Dept" and "Account
Summaries MF by Fund." If you select "Account Summaries MF by Dept"
you will see your accounts grouped by organizational level (dept). If you
select "Account Summaries MF by Fund" you will see the accounts
grouped first by fund and then by organizational level.
- Organizational Level Summary (#03) – This report displays revenue and expenditure GL class sub-totals
for the organizational level selected. This report can be printed for a specified
fund or for all funds.
- Employee by Distribution (#04) – This report is a listing of all employee distributions within
the selected organizational level. The employee records are grouped by organizational
level and account. There are now three choices at the bottom of the Process
Scheduler Request box. If you select “Employee (By Distribution)”
the report will be printed in alphabetical order by employee name. If you
select “Empl By Distrib (Title Shown)” you will see the grade
and title of the employee displayed. If you select “Empl By Distrib
(Title Sub Tot)” the report will be printed grouped by employee title
with subtotals for each title group. The employee GL classes are displayed
in columns. This report may be printed for any combination of fund and department
or for a specific account. This report includes a column named "Flg".
This column contains a flag that denotes whether or not an employee record
has been modified or manually added into the system. "L" indicates
that the employee record was pre-loaded into CBM from PeopleSoft HR or ADP.
"M" indicates that the employee record was pre-loaded and then subsequently
modified by a user. "N" indicates that the employee record was manually
added to CBM.
- All Funds Comparison With Employees (#05) – This report has multi-fund parameters. Each selected fund appears
on the report as a column. You can select any combination of up to seven funds.
Please note that for this particular report you should use a "txt"
extension when you name this report on the Process Scheduler Request box.
You can open the report from Microsoft Word or any word processing application.
Within Word, please change the setup to landscape for legal size paper. You
may also need to make the font smaller in order to fit all seven fund columns
across the page. Most reports take a minute or two to run, but this report
may take three to eight minutes to run to a file because of its complexity.
- IFR Allocation Worksheet (#06) – This two-page report displays the budgeted revenue and expenditures
by GL class for a selected IFR account. This report will be reviewed by the
Accounting Office for all Income Fund Reimbursable accounts. You can print
this report for a department or for a specific account.
- IFR Account Summaries (#07)
– This report is similar to the second report except it contains fields
that are specific to IFR funds. This report displays the budgeted revenue
and expenditures by major categories for each account within an organizational
area. The accounts are grouped by organizational level.
- Hospital VP Summaries (#08)
- This report is similar to the second report and is accessible by users with
Hospital VP security. It lists all Fund 40 accounts, even those which fall
in VP areas outside the Hospital.
- Salary Comparison (#09)
– This report lists the salaries of the GFT faculty in your department
for the associated models.
- Total Compensation Over Max (#10)
– This report lists all of the GFT faculty in your area whose total
compensation is 250% or 275% over the salary maximum for their rank.
- Account Summaries - Dual Depts (#12)
– This report displays the budgeted targets, revenue, allocation, and expenditures by major categories for each account within two organizational areas. This report can be printed for specific funds within departments or for combinations of funds (i.e., State & IDC). Its layout is the same as report #2.
- AF Account Notes (#14)
– This report displays AF accounts with allocation broken out by SUNY object codes and the notes associated with each account. It can be run to display accounts with negative budgeted objects only or for all accounts. This report can be printed for specific AF funds within departments or for combinations of funds.
- Admin Overhead Summaries (#15) - This report displays the revenue, allocation, and expenditures by major categories for each administrative overhead account (900760xx) within an organizational area.
- SBAM Account Master (#16) - This report displays accounts in the Stony Brook Account Master (SBAM) table based on the parameters input.
For samples of these reports, please refer to REPORT SAMPLES.